Technology
Troubleshooting the Xerox C8000
Last modified 3/26/2024
General Troubleshooting
This section contains procedures to help you locate and resolve problems. Resolve some problems by simply restarting the printer.
Printer Does Not Power On
Probable Causes | Solutions |
The power switch is not switched on. |
|
Caution: Directly plug the 3-wire cord with grounding prong into a grounded AC outlet.
Printer Resets or Powers Off Frequently
Probable Causes | Solutions |
The power cord is not plugged into the outlet correctly. | Power off the printer, confirm that the power cord is plugged in correctly to the printer and the outlet, then power on the printer. |
A system error occurred. | Power off the printer, then power on again. For more information, refer to Printing the Error History Report. If the error persists, contact your Xerox representative. |
The printer is connected to an uninterruptible power supply. | Power off the printer, then connect the power cord to a suitable outlet. |
The printer is connected to a power strip shared with other high-power devices. | Plug the printer directly into the outlet or into a power strip that is not shared with other devices. |
The Auto Power Off feature is enabled to save power. | Increase the Auto Power Off timer setting or disable the Auto Power Off feature. |
Printer Does Not Print
Probable Causes | Solutions |
The printer is in Power Saver mode. | On the control panel, press the Power/Wake button. |
The printer has an error. | If the Status LED is blinking amber, follow the instructions on the control panel to clear the error. If the error persists, contact your Xerox representative. |
The printer is out of paper. | Load paper into the tray. |
The incorrect paper is loaded for the print job. | Load the correct paper in the appropriate tray. At the printer control panel, specify the correct paper size, type and color. |
The paper settings for the print job do not match any paper loaded in the paper trays at the printer. |
|
A toner cartridge is empty. | Replace the empty toner cartridge. |
The waste cartridge is full. | Replace the waste cartridge. |
No control panel indicators are lighted. | Power off the printer, confirm that the power cord is plugged in correctly to the printer and the outlet, then power on the printer. If the error persists, contact your Xerox representative. |
The printer is busy. |
|
The printer cable is disconnected. | If the Status LED does not flash once after you send a print job, check the connection between the printer and the computer. |
There is a network-connectivity issue. | If the printer is connected to a network:
|
There is a wireless network setup or connectivity issue. | Verify that the Wireless Network Adapter is installed and properly configured. For more information, refer to Connecting to a Wireless Network. |
Printing Takes Too Long
Probable Causes | Solutions |
The printer is set to a slower printing mode. For example, the printer is set to print on Heavyweight paper or Envelopes. | It takes more time to print on certain types of special paper. Ensure that the paper type is set properly in the print driver and at the printer control panel. For details, refer to Print Speed. |
The printer is in Power Saver mode. | It takes time for printing to start when the printer is coming out of Power Saver mode. |
The way the printer was installed on the network can be an issue. | Determine if a print spooler or a computer sharing the printer is buffering all print jobs and then spooling them to the printer. Spooling can slow print speeds. To test the speed of the printer, print some information pages such as the Demonstration Print. For details, refer to Printing Information Pages. If the page prints at the rated speed of the printer, there can be a network or printer installation issue. For more help, contact the system administrator. |
The job is complex. | Wait. No action needed. |
The print-quality mode in the print driver is set to Enhanced or Photo. | Change the print-quality mode in the print driver to Standard. |
Document Prints from Wrong Tray
Probable Causes | Solutions |
Application and print driver have conflicting tray selections. |
Note: To have the print driver select the tray, set the tray used as the paper source to Auto Selection Enabled. |
Automatic 2-Sided Printing Problems
Probable Causes | Solutions |
Unsupported or incorrect paper. | Ensure that you are using the correct paper. Do not use transparencies, envelopes, labels, or reloaded paper for automatic 2-sided printing. For details, see Supported Standard Paper Sizes for Automatic 2-Sided Printing. |
Incorrect setting. | On the print driver Printing Options tab, select 2-sided Printing. |
Printer is Making Unusual Noises
Probable Causes | Solutions |
There is an obstruction or debris inside the printer. | Power off the printer, then remove the obstruction or debris. If you cannot remove the obstruction, contact your Xerox representative. |
Condensation Has Formed Inside the Printer
Moisture can condense in the printer when room humidity exceeds 85% or when a cold printer is located in a warm room. Condensation can form in a printer after it has been sitting in a cold room that is heated quickly.
Probable Causes | Solutions |
The printer has been sitting in a cold room. | Allow the printer to operate for several hours at room temperature. |
The relative humidity of the room is too high. |
|
Paper Jams
Locating Paper Jams
WARNING: Never touch a labeled area on or near the heat roller in the fuser. You can get burned. If a sheet of paper is wrapped around the heat roller, do not try to remove the paper immediately. Power off the printer immediately and wait 40 minutes for the fuser to cool. Try to remove the jam after the printer has cooled. If the error persists, contact your Xerox representative.
Caution: Do not attempt to clear any paper jams using tools or instruments. This can permanently damage the printer.
The following illustration shows where paper jams can occur along the paper path:
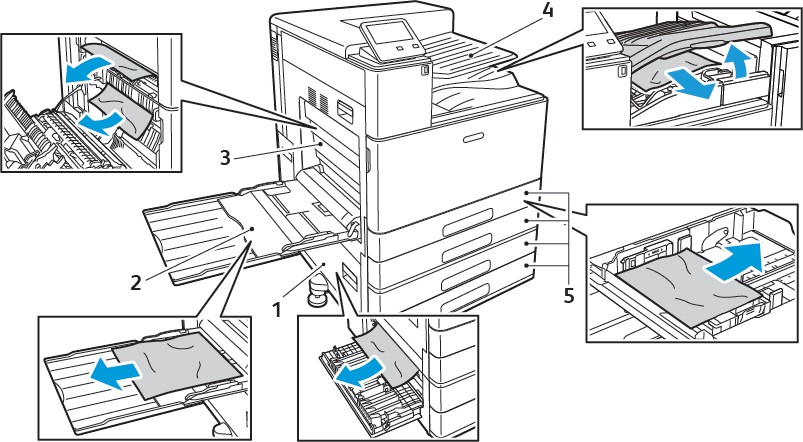
- Paper Tray Feed Area: Door B
- Bypass Tray
- Fuser Area: Door A
- Paper Output Area, and optional Finisher Transport
- Paper Trays 1–4
Note: Finisher jam locations are covered separately.
Minimizing Paper Jams
The printer is designed to function with minimal paper jams when you use Xerox-supported paper. Other paper types can cause jams. If supported paper jams frequently in one area, clean that area of the paper path.
The following can cause paper jams:
- Selecting the incorrect paper type in the print driver
- Using damaged paper
- Using unsupported paper
- Loading paper incorrectly
- Loading paper above the maximum fill line in the paper tray
- Adjusting the paper guides improperly
- Polyester-coated paper that is designed especially for inkjet printers
- Paper that is folded, wrinkled, or excessively curled
- Loading more than one type, size, or weight of paper in a tray at the same time
- Allowing the output tray to become overfilled To prevent most jams, follow these rules:
- Use only supported paper. For more information, refer to Supported Paper.
- Follow proper paper handling and loading techniques.
- Always use clean, undamaged paper.
- Avoid paper that is curled, torn, moist, creased, or folded.
- To separate the sheets before loading into the tray, fan the paper.
- Do not load paper above the maximum fill line.
- After loading paper in the trays, adjust the paper guides in all trays. A guide that is not properly adjusted can cause poor print quality, misfeeds, skewed prints, and printer damage.
- After loading paper in the trays, at the control panel, select the correct paper type and size.
- Before printing, select the correct paper type and size in the print driver.
- Store paper in a dry location.
- When jams occur printing on heavy coated paper, load that paper into the printer a single sheet at a time.
Clearing Paper Jams
Clearing Paper Jams from Trays 1–4
To resolve the error that appears on the control panel, clear all paper from the paper path.
Before removing the tray from the printer, review the paper jam message on the control panel. If another jam error appears, clear that jam inside the printer first.
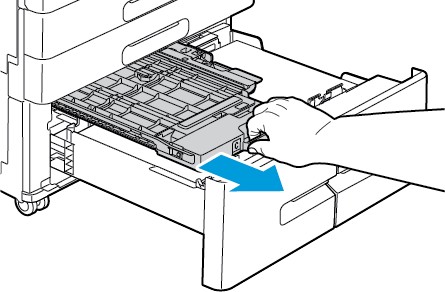
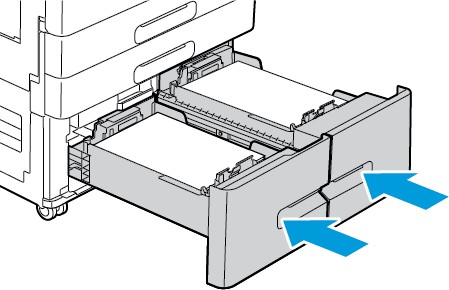
- Pull out the tray until it stops.
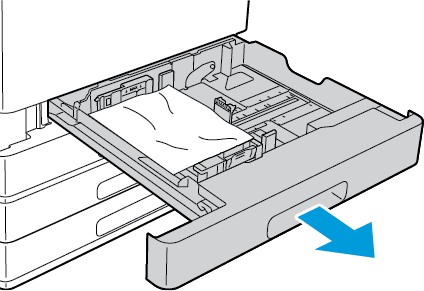
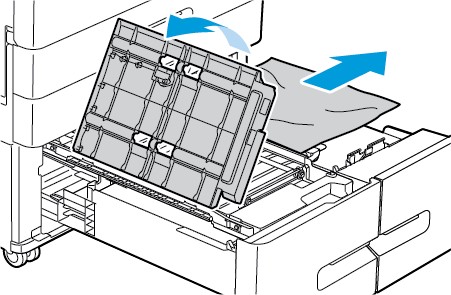
- Remove the paper from the tray.
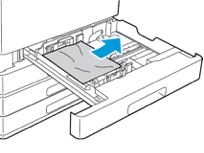
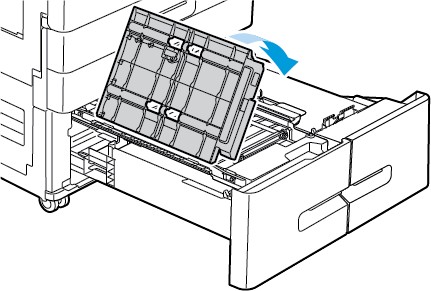
- If the paper is torn, remove the tray completely, then check inside the printer for torn pieces of paper.
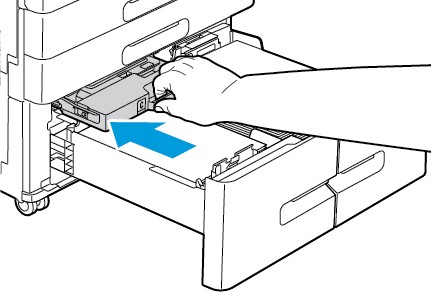
- Reload the tray with undamaged paper, then push the tray in until it stops.
- When paper trays are set to Fully Adjustable, you are prompted to verify or change the paper settings.
- To confirm the same paper size, type, or color, touch OK.
- To select a new paper size, type, or color, touch the current setting, then select a new setting. When finished, touch OK.
- To return to the Home screen, press the Home button.
Clearing Paper Jams from the Bypass Tray
- To resolve the error that appears on the control panel, clear all paper from the paper path.
- Remove the jammed paper from the tray. Ensure that the paper-feed entrance, where the tray connects to the printer, is clear.
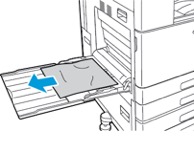
- If the paper is torn, check inside the printer for torn pieces of paper.
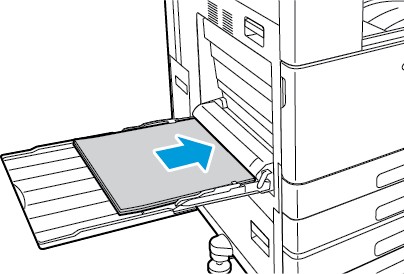
- Before you reload paper into the Bypass Tray, fan the paper, then ensure that all four corners are aligned.
- Insert the paper into the Bypass Tray with the print side face down. Ensure that the leading edge of the paper lightly touches the paper-feed entrance.
- When paper trays are set to Fully Adjustable, you are prompted to verify or change the paper settings.
• To confirm the same paper size, type, or color, touch OK.
• To select a new paper size, type, or color, touch the current setting, then select a new setting. When finished, touch OK. - To return to the Home screen, press the Home button.
Clearing Paper Jams at Door A
WARNING: Do not perform this procedure while the printer is printing.
Note: To resolve the error that appears on the control panel, clear all paper from the paper path.
- Lift the release lever, then open Door A.
WARNING: The area around the Fuser can be hot. Use caution to avoid injury.
Caution: Do not touch the Transfer Roller. Touching the roller can reduce image quality. - Remove the jammed paper.
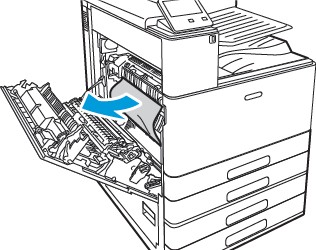
- If paper is jammed on the inside of Door A, remove it.
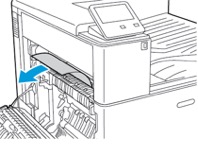
- If paper is jammed at the exit to the output tray, to remove the paper, carefully pull it straight out in the direction shown.
Note: Toner can adhere to the Transfer Roller. This residual toner does not affect print quality.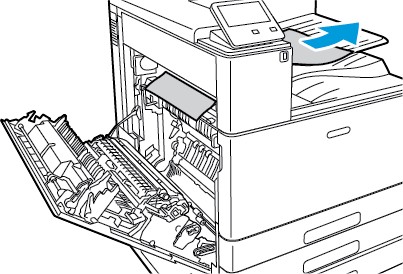
- If paper is jammed in the Fuser, remove the paper from areas A1 and A2.
- To open the paper guide, pull out handle A1.
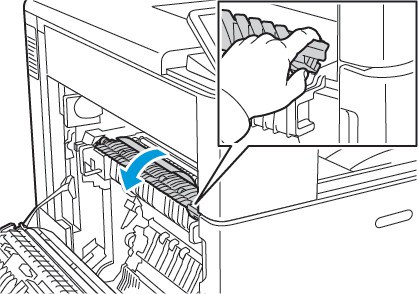
- Remove any paper in area A1.
- Lift handle A1 back into place.
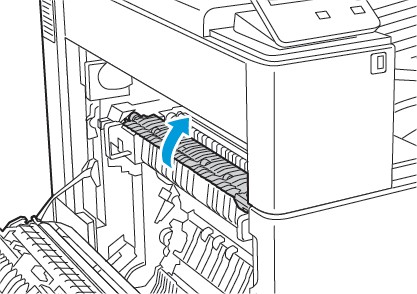
- To open the paper guide, lift handle A2.

- Remove any paper in area A2.

- To close the paper guide, swing handle A2 down, then push the handle firmly in, until the paper guide clicks into place.
Note: If the paper is torn, remove all torn pieces from the printer.
- To open the paper guide, pull out handle A1.
- To close Door A, push the door up firmly until it clicks into place.
Clearing Paper Jams at Door B
Note: To resolve the error that appears on the control panel, clear all paper from the paper path.
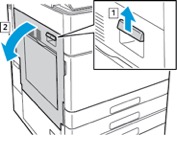
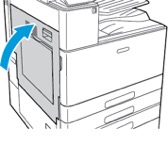
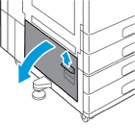
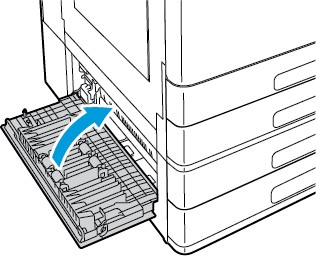
- Pull the release lever, then open Door B.
- Remove the jammed paper from the paper tray feed area.
Note: If the paper is torn, remove all torn pieces from the printer.
- For paper jammed in the upper position, look inside the printer, locate the jammed paper, then remove it.
Note: If the paper is inaccessible, refer to Clearing Paper Jams at Door A. - For paper jammed at a tray feed roller, open Trays 3 and 4, then remove the paper.
Note: The optional Tandem Tray Module is shown.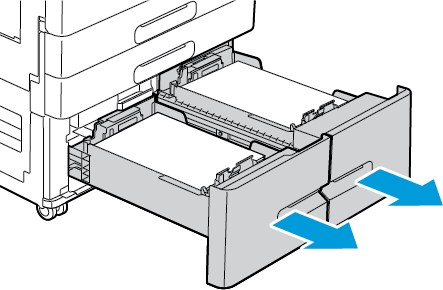
- For printers with a Tandem Tray Module, remove any paper jammed in the Tray 4 paper guide.
- Grasp handle C, then pull the Tray 4 paper guide until it stops.
- Lift the paper guide cover, then remove any paper.
- Lower the paper guide cover.
- Push the paper guide back into position.
- Grasp handle C, then pull the Tray 4 paper guide until it stops.
- Close the paper trays.
- Close Door B.
Troubleshooting Paper Jams
Multiple Sheets Pulled Together
Probable Causes | Solutions |
The paper tray is too full. | Remove some of the paper. Do not load paper above the maximum fill line. |
The edges of the paper are not even. | Remove the paper, align the edges, and then reload the paper. |
The paper is moist from humidity. | Remove the paper from the paper tray. Load new, dry paper into the tray. |
Too much static electricity is present. | Load a new ream of paper. |
Using unsupported paper. | Use only Xerox®-approved paper. For details, refer to Supported Paper. |
Humidity is too high for coated paper. |
|
The feed rollers are dirty. | With a clean, lint-free cloth moistened with water, wipe the feed rollers until they are clean. For details, refer to Cleaning the Printer. |
Tray is loaded with mixed paper. | Load the tray with only one type and size of paper. |
Paper Misfeeds
Probable Causes | Solutions |
The paper is not correctly positioned in the tray. |
|
The paper tray is too full. | Remove some of the paper. Do not load paper above the maximum fill line. |
The paper guides are not correctly adjusted to the paper size. | Adjust the paper guides in the tray to match the size of the paper. |
The tray contains warped or wrinkled paper. | Remove, smooth out, then reload the paper. If it still misfeeds, do not use that paper. |
The paper is moist from humidity. | Remove the moist paper and replace it with new, dry paper. |
The paper is the wrong size, thickness, or type. | Use only Xerox approved paper. For more information, refer to Supported Paper. |
Label and Envelope Misfeeds
Probable Causes | Solutions |
The label sheet is facing the wrong way in the tray. |
|
Labels are missing, curled, or pulled away from the backing sheet. | Do not use any sheet where labels are missing, curled, or pulled away from the backing sheet. |
Envelopes are loaded incorrectly. | You can print envelopes from the Bypass Tray or the Envelope Tray. For more information, refer to Envelopes. |
Envelopes are wrinkling. |
Note: When you load envelopes long-edge feed, ensure that you specify landscape orientation in the print driver. |
Paper Jam Message Stays On
Note: Check for, and remove, torn pieces of paper in the paper path.
Probable Causes | Solutions |
Some paper remains jammed in the printer. | Recheck the paper path and make sure that you have removed all of the jammed paper. |
One of the printer doors is open. | Check the doors on the printer. Close any door that is open. |
Jams During Automatic 2-Sided Printing
Probable Causes | Solutions |
Using paper of the wrong size, thickness, or type. | Use paper of the correct size, thickness, or type. For more information, refer to Supported Paper Types and Weights for Automatic 2-Sided Printing. |
Paper is loaded in the wrong tray. | Ensure that paper is loaded into the correct tray. For more information, refer to Supported Paper. |
Tray is loaded with mixed paper. | Load the tray with only one type and size of paper. |
Solving Print-Quality Problems
When the print quality is poor, select the closest symptom from the following table, then refer to the corresponding solution to correct the problem. To more precisely determine the print-quality problem, you can print a Demonstration Print page. For details, refer to Printing Information Pages.
If the print quality does not improve after performing the appropriate action, contact your Xerox representative.
Note:
- To maintain print quality, the toner and drum cartridges for many models of equipment stop functioning at a predetermined point.
- Grayscale images printed with the composite black setting increment the color-pages counter, because color consumables are used. Composite black is the default setting on most printers.
Print Quality Chart
Symptom | Probable Causes | Solutions |
Page margins are inconsistent.The image is not centered on the page or the margins are not consistent.
| A paper registration adjustment is needed. | To adjust the image position on the page, use the paper registration procedure. For details, refer to Adjusting Paper Registration. |
Faded printouts with multiple colors. | The toner cartridges are not Xerox® toner cartridges. | Verify that the toner cartridges meet specifications. Replace the cartridges if necessary. |
| The paper is outside the recommended specification range. | Replace the paper with a recommended size and type, then confirm that the device control panel and print driver settings are correct. For details, refer to Supported Paper. |
| The paper type in the paper tray is heavier than the paper type selection on the control panel or in the print driver. | Ensure that paper loaded in the paper tray matches your control panel and print driver settings. |
| The bias transfer voltage is not properly adjusted for the paper type. | Verify that the paper types set in the device control panel and the print driver match the paper loaded in the tray. |
| The settings in the application or print driver are incorrect. | Print the Demonstration Print from the Information Pages menu. For details, refer to Printing Information Pages. If the Demonstration Print looks correct, the printer is printing properly. Verify that the application and the print driver selections are correct for your print job. |
| The paper is damp. | Replace the paper. |
| The high-voltage supply is defective. | For assistance, go to the Xerox® Support website at www.xerox. com/office/VLC8000support or www.xerox.com/office/ VLC9000support. |
Only one color is faded.
| The toner cartridge is empty or damaged. | Check the condition of the toner cartridge, then replace it if necessary. |
| The drum cartridge is worn or damaged. | Check the condition of the drum cartridge, then replace it if necessary. |
The color around the edge of the printed image is incorrect. | The color registration is incorrect. | Adjust the color registration. For details, refer to Color Registration. |
The colors appear incorrect, or composite grays do not look neutral. | The color density or color balance requires adjustment. | Adjust the color density or color balance. For details, refer to Color Calibration. |
| The transfer voltage requires adjustment. | Adjust the transfer voltage. For details, refer to Transfer Voltage Adjustment. |
Stray black dots, or stray white dots in a printed image.
| The paper is outside the recommended specification range. | Replace the paper with a recommended size and type, then confirm that the device control panel and print driver settings are correct. For details, refer to Supported Paper. |
There is debris on the rollers. | To remove debris from the feed and exit rollers, wipe them with a clean, damp cloth. | |
The toner cartridges are not Xerox® toner cartridges. | Ensure that the toner cartridges meet specifications. Replace the cartridges if necessary. | |
The drum cartridge is worn or damaged. | Check the condition of the drum cartridge, then replace it if necessary. | |
Vertical black or color streaks, or multiple colored streaks or lines. | The toner cartridges are not Xerox® toner cartridges. | Ensure that the toner cartridges meet specifications. Replace the cartridges if necessary. |
Streaks in only one color.
| Debris in the printer is dragging against the toner, before the toner is fused to the paper. | Remove any debris or paper scraps from the paper path under the rear cover. |
| There is a problem with the toner cartridge for that color. | Check the toner cartridge for damage, then replace the cartridge if necessary. For assistance, go to the Xerox® Support website at www.xerox.com/office/ VLC8000support or www.xerox. com/office/VLC9000support. |
| The drum cartridge is worn or damaged. | Check the condition of the drum cartridge, then replace it if necessary. |
Partial blanks, creased paper, or blotted printing. | The paper is damp. | Replace the paper. |
| The paper is outside the recommended specification range. | Replace the paper with a recommended size and type. For details, refer to Supported Paper. |
| A printer part is worn or damaged. | For assistance, go to the Xerox® Support website at www.xerox. com/office/VLC8000support or www.xerox.com/office/ VLC9000support. |
| The toner cartridges are not Xerox® toner cartridges. | Verify that the toner cartridges meet specifications, then replace if necessary. |
| The paper is impeded in the paper path. |
|
| Condensation inside the printer causes partial blanks or creased paper. | To remove the condensation, power on the printer and leave it on for at least 1 hour. For assistance, go to the Xerox® Support website at www.xerox.com/office/ VLC8000support or www.xerox. com/office/VLC9000support. |
Vertical blanks appear. | The laser lenses are blocked. | Clean the laser lenses. For details, refer to Cleaning the Printhead Lenses. |
White lines or streaks running through multiple colors.
| A printer part is worn or damaged. | For assistance, go to the Xerox® Support website at www.xerox. com/office/VLC8000support or www.xerox.com/office/ VLC9000support. |
| The toner cartridges are not Xerox® toner cartridges. | Ensure that the toner cartridges meet specifications, then replace if necessary. |
White lines or streaks running through only one color.
| Something is blocking the lens for the affected color. | Clean the lens for the affected color. For details, refer to Cleaning the Printhead Lenses. |
White line or lines running through all colors.
| Paper or debris is dragging the bottom of the transfer belt. |
|
Slanted printing.
| The paper guides in the trays are not set correctly. | Reset the paper tray guides. For details, refer to Loading Paper. |
Blotchy or mottled images.
| The paper is too light or too thin. | Choose a different paper type at the device control panel, in the application, and in the print driver. |
| The paper is damp. | Replace the paper. |
| The humidity is too high. | Reduce the humidity in the room or move the printer to a new location. |
Spots or lines appear at regular intervals on the prints.
| One or more of the components in the paper path is marking the paper. |
Note: For assistance with a Fuser or Transfer Roller image-quality problem, contact Xerox technical support. For details, go to the Xerox® Support website at www.xerox.com/office/ VLC8000support or www. xerox.com/office/ VLC9000support. |