Technology
Parts of the Printer
Last modified 3/26/2024
Front View
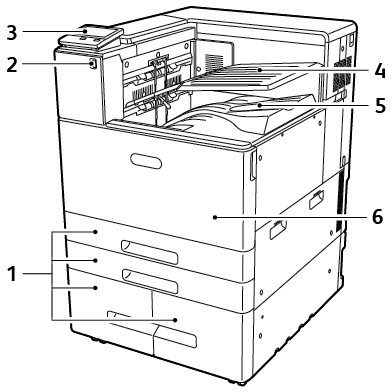
- Paper Trays
- USB Port (not active)
- Control Panel
- Center Top Tray
- Center Bottom Tray
- Front Door
Internal Parts
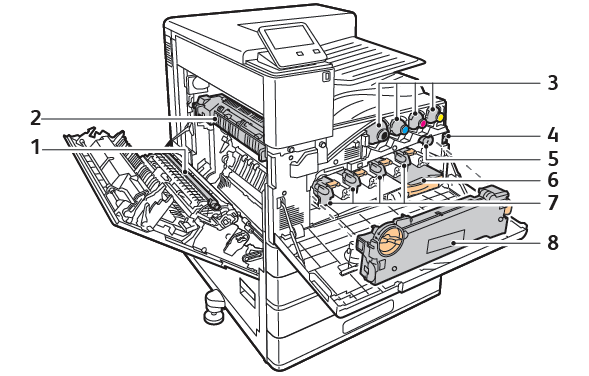
- Transfer Roller
- Fuser
- Toner Cartridges
- Main Power Switch
- Transfer Belt Cleaner
- Waste Catridge
- Drum Cartidges
- Waste Toner Transport Unit
Rear View
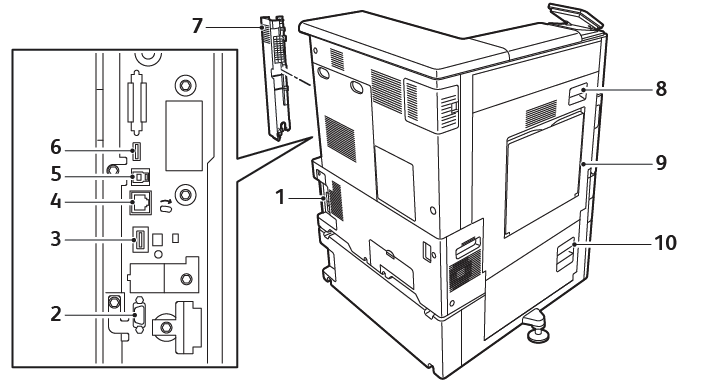
- Power Connection
- Foreign Device Interface
- Wi-Fi Connectivity Port
- Ethernet Port
- USB Host Port
- USB Device Port
- Right Rear Cover
- Door A
- Bypass Tray
- Door B
Control Panel
The control panel consists of a touch screen and buttons that you press to control the functions
available on the printer. The control panel:
- Displays the current operating status of the printer.
- Provides access to printing features.
- Provides access to reference materials.
- Provides access to Tools and Setup menus.
- Prompts you to load paper, replace supplies, and clear jams.
- Displays errors and warnings.
- Provides the Power/Wake button used for powering on or off the printer. This button also supports the power-saver modes, and blinks to indicate the power status of the printer.

- NFC Area (not active)
- Home Button
- This button provides access to the Home menu for access to printer features
- Touch Screen Display
- The screen displays information and provides access to printer functions.
- Power/Wake Button
- This button serves several power-related functions
- When the printer is powered off, this button powers on the printer.
- When the printer is powered on, pressing this button displays a menu on the control panel. From this menu, you can choose to enter Sleep mode, restart or power off the printer.
- When the printer is powered on, but in a low-power mode or Sleep mode, pressing this button wakes the printer.
- When the printer is powered on, holding this button for 10 seconds turns off the printer.
- This button blinks to indicate the power status of the printer.
- When the light blinks slowly, the printer is in low-power mode or Sleep mode.
- When the light blinks rapidly, the printer is powering down, or exiting a low-power mode.
- This button serves several power-related functions
- Status LED
- This light blinks blue or amber to indicate printer status.
- Blue
- Blinks blue once to acknowledge a successful Authentication request.
- Blinks blue once slowly for a print job initiated at the control panel.
- Blinks blue twice slowly for a print job received from the network.
- Blinks blue rapidly while the printer is powering up, or to signal detection of a Wi-Fi Direct connection request.
- Amber
- Blinks amber to indicate an error condition or warning that requires your attention. For example, an out-of-toner condition, a paper jam, or an out-of-paper condition for the current job.
It also blinks amber to indicate a system error, which typically is associated with an error code.
- Blinks amber to indicate an error condition or warning that requires your attention. For example, an out-of-toner condition, a paper jam, or an out-of-paper condition for the current job.
- Blue
- This light blinks blue or amber to indicate printer status.
- Pause Icon
- When a job is being scanned or processed, a Pause icon appears in the notification banner area. To pause the current job, touch the Pause icon. The job pauses with the option to resume or delete the job.
- Notification Banner
- Notifications and messages are displayed in a pop-up banner below the apps area. To view the full notification, touch the center of the banner. After you have reviewed the information, touch X to close.